Wednesday, December 31, 2014

Top 10 Post #10! Lettuce Wraps

Before we ring in the New Year, I need to finally write my post for my top 10 recipe from my first 300 pins.

When I was debating over what I would rank in the final top 10 spot, I was thinking about the Pinterest recipes we make again and again. There truly are very few recipes I wouldn't make again, as there are also very few recipes that are on our "regular" list.

That being said, the finally spot in the top 10 posts go to Lettuce Wraps.  The original recipes for "P.F. Chang's Chicken Lettuce Wraps" comes from food.com.
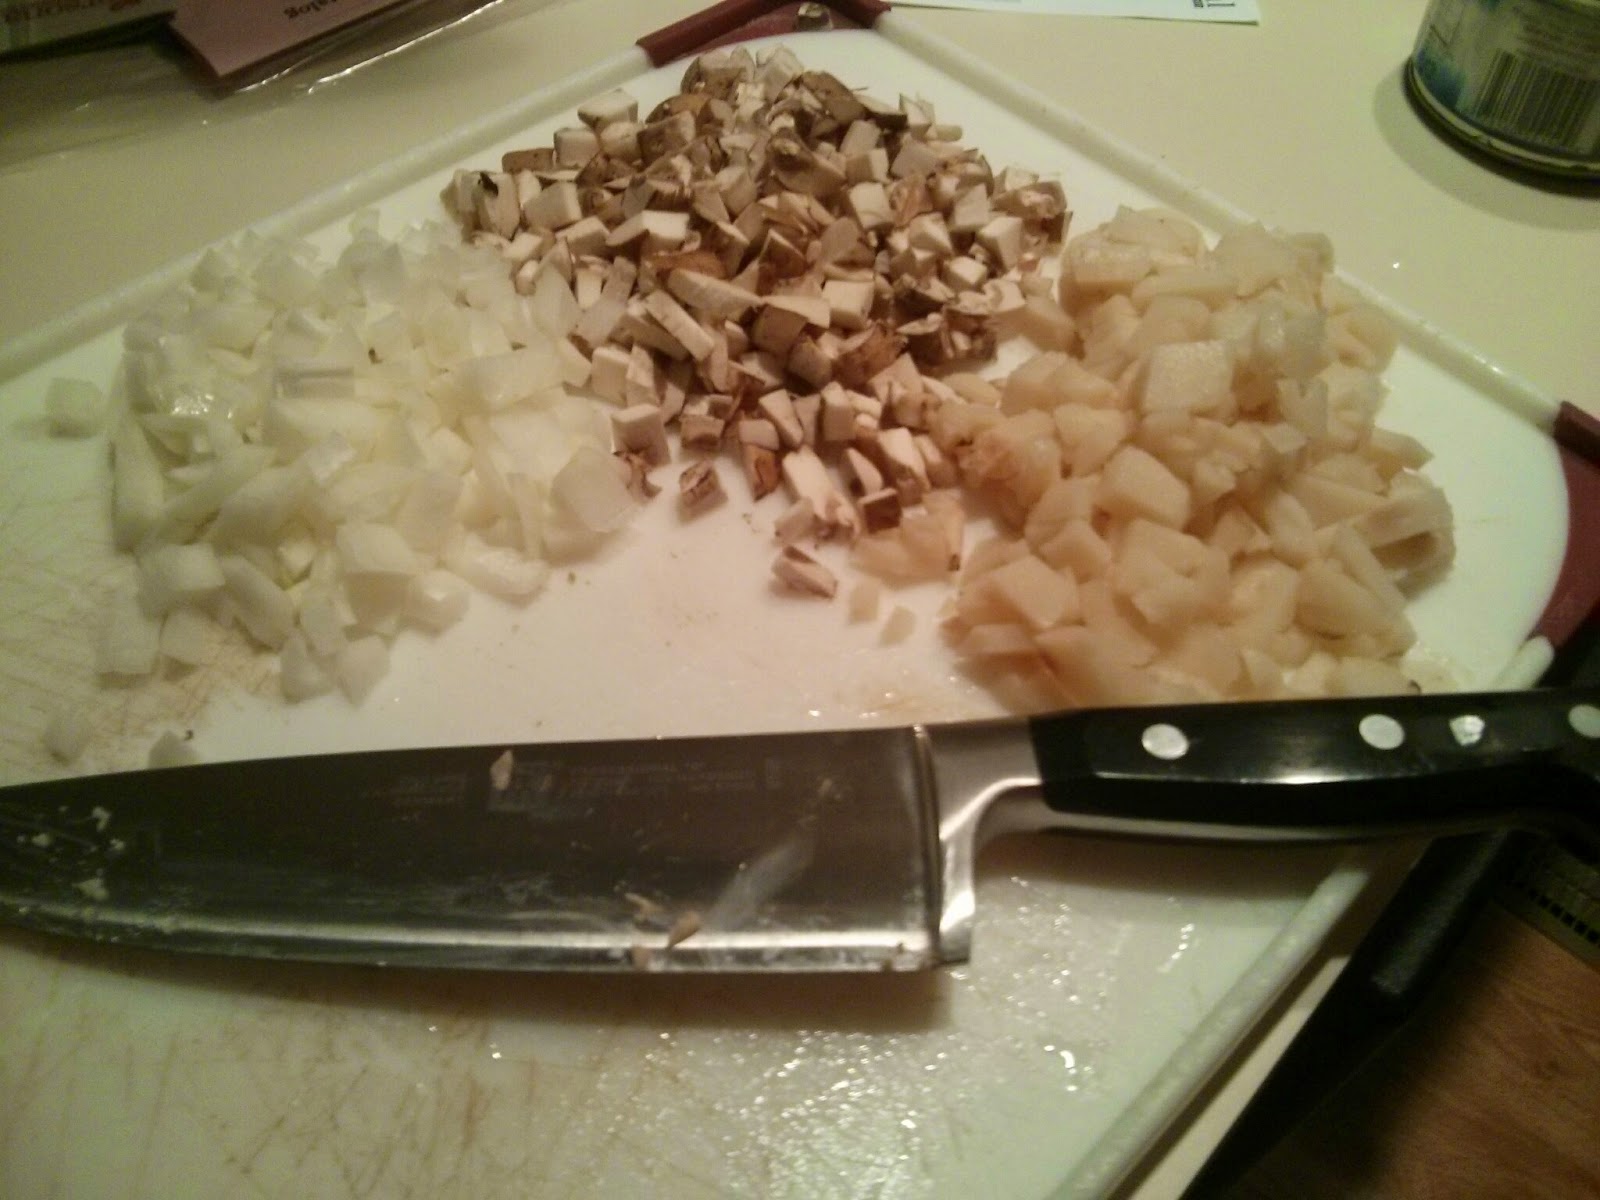


Ingredients:

Stir Fry
-3 Tbl. oil (we usually use canola)
-2 boneless, skinless chicken breast, diced*
-1 can of water chestnuts, diced
-4 oz. of mushrooms, diced
-half of an onion, diced*
-1 Tbl. of minced garlic*
-head of Boston Leaf Lettuce*
-crushed peanuts to top*


Stir Fry Sauce
-2 Tbl. soy sauce
-2 Tbl. brown sugar
-1/2 tsp. rice wine vinegar

Special Dipping Sauce (These ingredients are halved from the original recipe and still leave with plenty to use the next time you make lettuce wraps.)
-1/8 C. sugar
-1/4 C. water
-2 Tbl. soy sauce
-2 Tbl. rice wine vinegar
-2 Tbl. ketchup
-juice of half of a lemon*
-1/8 tsp. sesame oil
-1 tsp. of garlic and red chili paste

-The original recipe calls for 1 Tbl. of hot mustard diluted in 2 tsp. of hot water.  We omit this.  There is great flavor without it.

First, dice all ingredients approximately the same size (chicken, chestnuts, mushrooms, onion).  Heat the oil over a large pan.  Cook the diced chicken until cooked through. *Please note the original recipe calls for the chicken to be cooked as a whole breast than diced, we've found this to be quicker and easier.*

Add in the remaining stir fry ingredients.  Meanwhile mix the stir fry sauce.  After allowing the stir fry to cook for 2-3 minutes, pour in the sauce and allow it to simmer for a couple of minutes.

While the stir fry simmers, mix the special dipping sauce, crush peanuts and rinse off the lettuce. We like the addition of the peanuts to top the wraps.  The original recipe calls for iceberg lettuce which doesn't allow you to really wrap your lettuce wraps.  We've started using Boston Leaf lettuce which works very well!

This is a light dish that is filled with protein- it would be a great way to start of the New Year!  Enjoy!

Monday, November 24, 2014

What Happened to November? Top Ten Posts 8 and 9


I knew I needed to write my next blog post, but I was shocked to see I hadn't written since October!  What happened to November?  I guess I have been too tired from my pregnancy, plus teaching Kindergarten (and dance), and grad work.  Plus it is quickly becoming the most wonderful time of the year! I have certainly spent much, too much time on Pinterest searching for Christmas ideas.

Two weeks ago, I tried 6 new recipes.  A new dinner recipe each day for the week.  I have to say they were all a huge hit, aside from the last one.  I am sure I will post these recipes when I make them again- which I am certain will happen again soon!

For Top 10 Post 8:
I am going to link back to my Fourth of July post:  Happy Fourth of July:  Celebrating with Something Sweet!  This is by far my favorite cake pop recipe.

I have tried the Wilton version of cake pops by baking a cake, breaking it up, and mixing it with icing. This method I have tried with store bought frosting and my own buttercream.  I have to say, cake pops this way are so much better with homemade buttercream.  A cake decorator said she couldn't tell the difference between store bought and homemade icing.  I, however, tasted a HUGE difference.

Even better than this method, is the baked cake pop.  I used the recipe from Nordic Ware.  The cake pops are more of a brownie consistency, but they were so rich and wonderful.  I prefer this method because there was less time waiting on cooling and refrigerating.  Also, I feel that the Wilton cake pop idea is too sweet once you've mixed in the cake and the icing, then dip it in chocolate.

I haven't made cake pops since the 4th, but I will be making some more this week.

For Top 10 Post 9:
Again, I am linking back to a previous post.  My post on carrot cake- Favorite Cake.  Let me note, the title does not denote my favorite cake, but Pat's.  As you know, I am a huge chocolate and PB fan, BUT  this carrot cake is something! My recipe is adapted from Southern Living.


Now the tough part...to decide what the remaining recipe is for the Top 10 out of 300!  Stay tuned!

Tuesday, October 28, 2014

Top Ten #6 and #7: Apple Goodness

Last week, I was scrolling through my "Recipes I've Tried" board searching for the Orange Peel Shrimp recipe.  As I was searching, I was trying to find some of our other favorites that I hadn't made in awhile.  I came across two of my FAVORITE apple dishes:  Apple Egg Rolls and Apple Cake.  Looking at my pins, the first time I made both dishes was more than two years ago.

The apple egg rolls are a quick and easy dessert that originally came from thriftyfun.com.  The first time I made this recipe, I followed it exactly.  Since then, I have cut waaaaaay back on the sugar and I do not even bother with the whipped cream. The whipped cream was tasty, but the egg rolls are so full of flavor, you really don't need any additional flavor, especially sweetness.  Aother main difference I found is, I believe the original post used wonton wrappers. I continue to use egg roll wrappers.  As a result, I make 6 apple egg rolls each time.  My last change, is that I do not do the egg wash to wrap the egg rolls.  Just like in my crab rangoon, I seal the wontons shut with water.  

Apple Egg Rolls
Ingredients:
- 2 Macintosh apples, peeled and chopped into small pieces
-juice of 1 lemon
- 3 Tbsp. of sugar
-4 Tbsp. of flour
-2 tsp. cinnamon
-1/4 tsp. allspice
-1/8 tsp. salt
-6 egg roll wrappers

Optional
-cinnamon sugar
-butter


Once your apples are peeled and chopped, squeeze the lemon juice over the apples.  Mix well.  In a separate bowl, combin the remaining ingredients.  Then mix the flour, sugar, and spices in with the apples.  


Next, place about 1/6 of the apple mixture onto each wrapper.  Fold and seal with water.  Bake at 350 for 20 minutes.  After 20 minutes, you may coat with butter and sprinkle on cinnamon sugar.  Finally, bake for 5 more minutes and enjoy!


Another apple (and all time) favorite recipe comes from Paula Deen for Uncle Bob's Fresh Apple Cake.  This recipe is honestly, the best apple cake I have ever made.  I follow the recipe exactly from Paula Deen.  

The batter is nice and thick so I always use my mixer.


Be sure the apples get nicely coated from the spices.


Be sure the apples get evenly distributed in the batter and that your bundt pan is nicely greased and floured. My cake always plops right out!


After the cake cools for an hour, you can mix up and pour on the glaze.


I didn't go through this recipe because I do follow it exactly from Paula Deen.  This recipe is so wonderful.  Be sure to check out both of these recipes, that apple egg rolls are quick to whip up!

Enjoy and happy baking!


Wednesday, October 22, 2014

Top Ten Post #5: Orange Peel Shrimp

So you have heard before that Wednesday night is shrimp night.  I've been feeling in a rut lately and not knowing what to make.  Thankfully Pat suggested this, which has been one of our favorites since we first made it!  Whenever we go to P.F. Chang's I have to have the Orange Peel Shrimp.  Everything that I have ever eaten there has been great, but nothing will beat the Orange Peel Shrimp. So you can image my delight (about 2 years ago) when I came across a Pin for Orange Peel Shrimp.  The pin I found came from EatLiveRun blog.  However, the recipe comes from PBS.

This recipe results in crispy, flavorful shrimp.  We do always serve the Orange Peel Shrimp with brown rice and another favorite green, edamame (Yes, Pat eats a few green things now!).

I know I say you have to make each recipe I blog about, but really...I wouldn't waste your time reading the post if the results weren't well worth it.  When your closest P.F. Chang's is an hour away, you'll be really glad you have this recipe in your inventory!

We just cut the sauce recipe in half from the original since it's just for two and use half a pound of shrimp.

Here's our ratio for the recipe, but the recipe comes from PBS.

Ingredients:
- 1/2 lb. of shrimp, peeled and deveined
-2 cloves of garlic
-4 scallions (I cut the white parts to use too)
-1 orange (zest and juice)
-3 Tbsp. orange marmalade (I do use the reduced sugar)
-1/4 C. of soy sauce
-1/4 tsp. of crushed red peppers
-1/8 C. of cornstarch
-2 Tbsp. of canola oil, divided


Brown rice and Edamame for sides

Start by adding 1 Tbsp. of oil over medium high heat.  Once heated, add the garlic, scallions, and orange zest.  Then add the juice from the orange, orange marmalade, soy sauce, and crushed red peppers.  Bring it to a boil and maintain the boil for about 5 minutes so the sauce thickens.

Meanwhile, get the salted water boiling for rice and stick your edamame in the microwave per bag instructions.


Peel your shrimp and pat it dry.  Then lightly coat the shrimp in the cornstarch.  Add the remaining oil to another pan (only bummer about this recipe is the amount of pans it requires).   Once heated, add your shrimp.  After about 2 minutes, it's ready to flip.  When it is cooked through, remove the shrimp from the pan and mix it into the sauce.

Serve and enjoy!


My chef notes:
1.  I probably do a tablespoon and a half of minced garlic.
2.  I also cut the white parts of the scallions to use, too.
3.  For the marmalade, I used the kind with reduced sugar.
4.  The original recipe calls for optional Thai chili peppers, we do not add those, so we keep with the original 1/4 tsp. of crused red peppers.


I definitely use more soy sauce than the average person....this is not the only jug we've been through this year!

Sunday, October 12, 2014

Apple Rose Pastry Roll

I may have made this for the first time last night.  It was so incredible, I couldn't wait to share this recipe with you!  The recipe for Spiral Apple Bread with a Caramel Apple Glaze comes from Inspired by Charm.


I decided to call this an Apple Rose Pastry because it looks so beautiful, that I do not feel Spiral Apple Bread does this decadent pastry any justice.  Please note that this recipe would definitely be a Top Ten post, but I didn't make it in my first 300 pins.  It is without a doubt the best thing I have made since reaching the 300th recipe mark!

My mom had us over for dinner last night and I offered to bring dessert.  I had been thinking about this  recipe since I pinned it.  As I read over the blog post this week, I knew I had to make this recipe very soon.

I made two minor adaption to this recipe.  Inspired by Charm used Granny Smith apples; I used Macintosh apples.  Macintosh are my absolute favorite apple to use when baking.  The glaze calls for apple cider, and I substituted milk instead.  The glaze had a wonderful flavor and there is nothing else I would do to change or adapt this recipe. The dough was a great texture and consistency for rolling out and it had a great flavor.  There was a perfect blend of dough and of apples.  Also, despite the butter and cinnamon sugar, plus the glaze, this recipe wasn't too sweet...it was just right!  The last and final thing about this recipe is that it makes two! Let's just say my day started out by baking the second one for breakfast.  As my mom would say, "The breakfast of champions!"

Ingredients:
2 cups all-purpose flour
2 tablespoons sugar
1 package of instant yeast
1/2 teaspoon salt
1/4 cinnamon

3/4 cup  milk
2 tablespoons unsalted butter, melted
3 Macintosh apples peeled, cored, and thinly sliced 


2 Tbl. of melted butter (for each pastry roll)
1/8 C. of cinnamon sugar (for each pastry roll)

2 Tbl. of butter (for each pastry roll)
1/8 C. of brown sugar (for each pastry roll)
1/4 C. of powdered sugar (for each pastry roll)
1 Tbl. of milk (for each pastry roll)

Mix the first five ingredients together in your stand mixer.  Melt the butter in the microwave and stir in the milk.  *Please note the original recipe calls for warm milk, but I melted the butter then poured in the milk and it was nice and warm from the melted butter.

Add the butter and milk into your bowl and kneed for several minutes until it's formed into a ball.  Lightly spray the bowl and cover with saran wrap or a towel.  Allow the bread to rise for 1.5 hours.

Meanwhile, peel and slice the apples. I used my apple corer/ slicer.  Then I cut each slice into fourths.


After the dough has risen, punch down the dough and split into two.  Using half of the dough, roll it out thin, then cut into 1/2 inch strips.  

Begin to spiral the dough from the center out using a pie pan (The pan doesn't need to be sprayed).  Tuck in apple slices between the layers.  When the strip of dough runs out, pinch on another strip of dough.  Continue until you're out of dough.  I prepped both pans at the same time.  Then allow the dough to rise for another 45 minutes.


I then baked one and placed the second in the fridge to bake this morning.

Bake at 350 for 25 minutes.  Once the roll is out, melt all of the remaining butter (4 Tbl.) in a sauce pan.  Drizzle half of the melted butter on the roll and sprinkle with cinnamon sugar.


While that sits, add the brown sugar, powdered sugar, and milk to the saucepan with the remaining butter. Mix together and allow to boil.  Pour this on top and enjoy!


This recipe took a long time from start to finish, but it was not challenging to make.  It looks wonderful and tastes even better.  I was afraid I was going to have wished I made apple pie, but no one was disappointed to say the least!

Sunday, October 5, 2014

Top Ten Post #4: Shrimp and Grits

Somehow Pat and I decided to try shrimp and grits for our weekly shrimp night a couple of years ago.  I have no idea how we decided on this because our only grits experience was with a lot of butter from the Waffle House...

Anyway, this recipe is one of our more regular recipes and it definitely is in our top ten!  We made it this week for dinner and Pat asked, "Have you blogged about this?"  Good thing he asked.  We make it so much I would have never thought to.

Our favorite recipe comes from the Food Network.  Check out their set and see the high rankings for this dish- Lemon-Garlic Shrimp and Grits.

This is one of those recipes that we don't ever look at to prepare anymore.  I cook the shrimp and Pat cooks the grits.  The first few times we made this, we followed the recipe exactly.  It is now adapted to be our favorite. Here's what we do based off of the Food Network's recipe.

This recipe is for two!

Ingredients:
2 C. of water
1/2 C. 5-minute grits (not instant like their recipe says)
Salt and Pepper sprinkled in to your liking
1 Tbl.  butter, unsalted
1/2 C. grated Parmesan cheese

1/2 lb. of shrimp, peeled and deveined
1 Tbl. minced garlic
Salt and pepper to season shrimp
1 Tbl. of butter
1 lemon, juiced


Bring water to a boil.  Whisk in the grits, until the grits thickens (when the grits stick to the whisk).  Next add the butter, salt, and pepper. Once the butter is melted, add the Parmesan cheese and whisk until melted in.


While the grits is cooking, melt the butter over medium heat.  Add in the garlic and let it cook for 1 minute.  Meanwhile, pat the shrimp dry with a paper towel and coat both sides with salt and pepper.  Add the shrimp and cook about 3 per side.  Once the shrimp is cooked through, chop the shrimp into bite sized pieces and squeeze in the lemon juice.


Scoop grits into bowls and top with the shrimp and lemon/ butter sauce.  Enjoy!

Monday, September 29, 2014

Top Ten Post #3: Oven-Baked Chicken Fajitas

Where did September go?!  I had been posting regularly and then school started...

As I have been looking back over my "Recipes I've Tried" board, I really am struggling to pick my top ten!  I easily could do a top ten desserts post...maybe I'll do that once I work my way through my top 10 overall.  So basically I've been deciding my top ten recipes by thinking which recipes are regulars.  I always feel like we eat the same things, which we don't- at all.  If we eat the same thing twice in a month, that's super rare.  I get bored eating the same thing again and again.  Another big hit in our house is Oven Baked Fajitas from Real Mom Kitchen.

I first made this recipe a few years ago and we still love it as much to this day!

We follow the recipe from Real Mom Kitchen precisely, but we put in less chicken and add more veggies.


Ingredients:
  • 2 Tbl. vegetable oil
  • 2 tsp. of each chili powder and cumin
  • 1/2 tsp. garlic powder
  • 1/2 tsp. oregano
  • 1/4 tsp. salt
  • 2 chicken breasts, thinly sliced
  • 1 large onion, thinly sliced
  • 1 red bell pepper, thinly sliced*
  • 1/2 green bell pepper, thinly sliced
  • 15 oz. can of diced tomatoes with green pepper and onion*
We combine the first 6 ingredients in a small bowl.  Next, spray a 9x13 pan with cooking spray and toss in the peppers, onions, and chicken (all thinly sliced).  Then we pour the sauce into the pan and stir to combine.  Bake the fajitas at 350 for 25 minutes.  Right before the fajitas get pulled out, heat up some tortillas in the microwave.  We always have plenty for lunch the next day.


We love this recipe because it is so quick, easy, and full of flavor.  Sometimes we make the fajitas without the tomatoes  and there is still nice flavor.  I love the flavor the tomatoes add, but it does make the fajitas a bit more runny.

I do add a whole red bell pepper because I love them.  Real Mom Kitchen uses the tomatoes with chillies, but I prefer the green pepper and onion.  I've tried other baked fajitas and I've tried Crock-Pot fajitas, but this recipe is by far the best!  Try it tonight- I promise you add it to your dinner cycle.

Wednesday, September 3, 2014

Top Ten Post #2: Black Bean and Spinach Enchiladas

This weekend I made my 312 Pinterest recipe!  As I am working my way to Pin 400, I am going to first finish writing about my top ten from the first 300.

The first top ten recipe I wrote about can be found here for baked crab rangoon.

A second favorite of ours is a Black Bean and Spinach Enchilada.  The recipe comes from The Garden Grazer.  This is a great vegetarian dish and it has made it routinely into our Meatless Mondays.  The only thing we do differently is omit the cilantro.  I simply do not care for it. Aside from the cilantro, we keep it exactly the same; we absolutely love it the way it is!  The recipe even goes well using wheat tortillas if you prefer.


This dinner comes together quite quickly.  First prepare the filling while the oven is preheating.


After the filling is made, I start to make the enchilada sauce. The sauce is quick and easy to make, but if you want to save a few more moments, you could use store bought sauce. 
*Do be careful that the pan isn't too hot when you begin to make the sauce.  I heat the olive oil over a medium low heat.  Otherwise the tomato paste will splatter.*
 Next, put about 1/3 a cup of filling into each enchilada and roll each tortilla as nicely as you can (hopefully better than I do).
Pour some sauce onto the enchiladas.  Then be sure to sprinkle generously with cheese!


After baking for 20 minutes, it is time to dig in!  One of the best things about this recipe is that there is plenty to pack for lunch the next day.


Saturday, August 23, 2014

Chocolate Sheet Cake

My mother-in-law asked me to make a Very Hungry Caterpillar cake for my cousin's baby shower.  I was very excited to be asked, but of course terrified of messing up!  For several reasons:
1.  Google Very Hungry Caterpillar cakes and you will see the good, the bad, and the UGLY.
2.  I've never made a sheet cake larger than 9x13 before.
3. A baby shower cake is a lot of pressure
4.  My favorite chocolate cake recipe loves to fall apart.
5.  Would I decorate using 1,000,000,000 different colors or use fondant?
6.  How do you transport a cake that size?

I spent a lot of time researching recipes and tips and tricks for large cakes.  I thought about trying different techniques with my favorite chocolate cake, but wanted to be safe.  I decided to make King Arthur Flour's Favorite Fudge Cake.

To ensure the cake would successful be removed from the pan, I not only greased and floured the pan, but I also used parchment paper.  Then I greased and floured the pan again.  I was baking the cake in a 12x18" cake pan that is 3" deep.  I started by doubling the recipe since makes a 9x13.  After seeing what that amount of batter looked like, I decided to make one more batch (so yes, I ended up tripling the recipe for a 12 x 18" pan).

Having read other blogs and baking forums, I decided to bake the cake at 325, instead of 350.  I debated about using the flower nails or Wilton's Bake Even Strips, but I decided not to use either.  The batter was very easy and quick to prepare.  However, I ended up baking the cake for over 1.5 hours!!!

Please look at large this cake is in comparison to my tiny oven!

I thought the edges/ center were interesting.  The cake was cooked the whole way through!


Phew!  My large cooling rack helped!


Anyway after allowing the cake to cool for 10 minutes and saying a big, long prayer that cake came out of the pan effortlessly and yes, in tack!

This morning I woke up super early to get decorating! I was going to have my husband cut a piece of plywood to fit in my large cake carrier.  However, he was sound asleep.  What did I do?  I cut a piece of drywall to fit the cake carrier using an utility knife and wrapped it in aluminum foil.  It worked quite well!

I ended up using my Decorator's frosting, instead of my classic buttercream.

First, but on a light crumb coat.

Then,  allow the crumb coat to dry.  During this time I decided to get to work on my fondant.  I cut out my shapes by hand and used the book to guide me.

Once, I had a general feel for my fondant caterpillar, I frosted my cake.  A trick a learned in a cake decorating class is to use Viva Paper towels to smooth the cake.  Viva isn't textured.  I have even decided to use the fondant smoother to help "iron" out the frosting.
Ironing out the frosting
The "bottom" of the cake has been smoothed out.  See the difference?


I used gumballs for the border.

Then I put out my caterpillar.  I made a cute little strawberry for the caterpillar to eat!

                               
I used the Wilton candy pens to add a face to my sun and dots to the strawberry. To accent the blue gumballs, I decided to write the Congratulations to the Mommy to be in blue.

Here's the finished product:

What do you think?


Sunday, August 17, 2014

Top Ten Post #1

As I ended my post about recipe number 300, I said how my mom asked what my top 10 recipes are.  That's hard to tell, but I am going to blog my way through my top ten.  They are not in any particular order (at least not yet).

One of our favorite Chinese appetizers is crab rangoon.  A really gross, late night Chinese restaurant in College Park is where we first ate them.  Then it was discovered that our favorite Chinese restaurant, that I mentioned previously in a post, made THE BEST crab rangoon.  Although, one day that fabulous crab rangoon changed and was never again the same...maybe that's why they closed down?!  They did make a lot of money off of us ordering way too many crab rangoon(s?)...

One day on Pinterest, I found a Weight Watcher's recipe for crab rangoon. We tried it and were impressed.  I have made many modifications to the recipe and it is pretty darn close to the wonderful ones we would stuff our faces with in college.

My Baked Crab Rangoon
 Ingredients:

  • 6 oz of 1/3 reduced fat cream cheese 
  • 1 stick of imitation crab meat
  • 1 Tbsp. of sugar
  • 1/8 tsp of garlic salt
  • 1/4 tsp. of worcestershire sauce
  • 2-3 green onions, finely chopped
  • 16 wonton wrappers


Directions:
Preheat the oven to 350.  I always individually bag and freeze the imitation crab meat sticks.  Whenever I make crab rangoon I soften the cream cheese and the crab meat by heating it in the microwave for 30 seconds.  Then I dice the crab meat.  I mix in the ingredients one at a time.  

I frequently make these for lunch so I don't really measure ever.  Measurements for me are 8 shakes of this, a good sprinkle of that but I the measurements are what I toss in.  I have tried this recipe with regular cream cheese and various amounts of sugar and garlic salt, but these measurements result in my favorite ratio.


I have a race with the oven and can always have these ready to go in the oven as soon as it's preheated.  I spray the cookie sheet.  Then lay out the wonton wrappers and put about a tablespoon of the filling on each wrapper.


 I wet the edges of wrappers and fold up opposite corners.

I bake them for about 10 minutes, until they are golden brown.  They are hard to resist long enough to let them cool...